
My Herbs Blog |
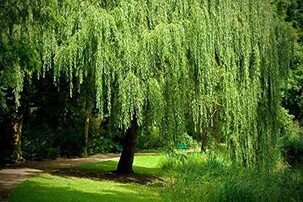 As a homeschool mom, I find every opportunity to teach my children how to incorporate nature into their lives. It is not so much about incorporating, actually, but integrating. We see nature as life and life as nature. It is not uncommon for us to spend a few hours outside a day, even in the winter time. Spring and summer is my favorite time as an herbalist, because that is when the landscape is in bloom, plants are thriving, and botanicals can be identified. A great activity to do with your children during the warmer months of the year, is to identify plants, draw them, and look up their uses. Trees are especially enjoyable, because the bark can be used to make a rubbing in an art journal, and I have found that children adore this activity. The tools you will need to perform this exercise, are as follows: an art journal with blank pages, a pack of tracing paper, masking tape, scissors, a piece of charcoal, pens and pencils, colored pencils and a thorough nature identification book. I suggest that before you begin you make a plan for the area in which this lesson will take place. You may have the perfect yard with a variety of trees, or you may need to consider going to a friend’s house, a relative’s, or a park. This activity is easier, if as the adult, you already know some of the tree species. If not, you can enjoy this activity more fully with the children, or enlist the help of someone who has lived in your locality for a long time. I have found that the older generation has extensive knowledge, when it comes to identifying plant species. If you have a willow tree that can be identified, I advise you start there. This tree is easy to identify correctly, and you can even read the story The Giving Tree, by Shel Silverstein, with your children before beginning. The White Willow tree is a short, sturdy tree that grows 30-60 feet. Willows have leaves 3-6 inches long, resembling green fingers. The willow bark is smooth and red-brown to green-brown in color. 1 When you approach a tree, ask your children if they know what the tree is before commencing. You may be surprised what your children already know. After pinpointing your tree, have your child open a page in their art journal. Write the name of the tree, with the scientific name; White Willow is Salix alba. Then have the children draw a little sketch of the tree. Encourage them to do their very best, and not to worry about being perfect. It is important that they try this activity. After a 15 minute drawing break, help each student hold a piece of the tracing paper up to the tree bark. If you hold the paper for them, they can use their hands to grapple with the charcoal. The charcoal needs to be held horizontally with the flat edge and gently rubbed over the paper to form the impression of the bark. You may need a few attempts to get a good rubbing. Then cut out the best rubbing and tape the piece of paper to a clean page in your child’s art journal. Again label the page with the name Willow a.k.a. Salix alba. The last part of this lesson is to talk about the medicinal benefits about the tree, parts used, and history of its usages. Some of this information should be written on a fresh page, right after the artwork of each tree. Leave a blank page in the journal to divide the space between identified species. Willow bark has been used for over a thousand years to relieve pain. Salicin is an active component in White Willow bark, and is the forerunner for the drug aspirin. Apart from the constituents in salicin working to relieve pain, it also reduces inflammation. 2 The Cherokee, Blackfoot, Iroquois and other Native American tribes used closely related species for headache relief, fever and chills, and for muscle and joint pains.3 Researching the historical compilations of each tree identified, will result in some interesting folklore, that your children are bound to remember. The “weeping” willow as it is commonly named, may partially have received that nickname from the branches that arch over, bending to the ground. In traditional folklore, the willow is associated with death, heartbreak, sorrow, and lost love. In the Bible, it is said that the children of Israel, when taken into captivity by Babylon, mourned under the willow tree. In medieval times, sprigs of willow were worn as signs of grief and mourning. 3 I hope that through this article I was able to give the reader an outline of an activity that can be repeated numerous times with many plants, trees and herbs. I also encourage you to add your own twists and spins to my very basic lesson. Any children participating in this activity may also have creative ideas to add this study. You could even go so far as to acquire the dried bark, or herb and have your pupils smell, or taste the said plant, when applicable. In my own herbal apothecary I keep dried willow bark powder, and have used it for fevers and to relieve pain from childbirth. Try to demonstrate as many connections from the earth to the home and uses in life that will bridge the nature gap, that you as an adult may understand more clearly. Have fun! 1 Fun with Nature, Burns, 1999, p.243 2 The Herbal Drugstore, White & Foster 2000, p.243 3 Desk Reference to Nature’s Medicine, Foster & Johnson p.366-367 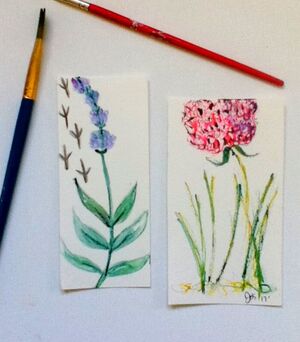   Click to Link to My video on drawing this dragonfly. Click to Link to My video on drawing this dragonfly. I should preface this post by saying that I am a Licensed Art Educator. I have taught in public schools, private schools, public and private settings and allllll ages, from 2 or 3 up to probably 80 years of age. I love to teach, and feel called as a teacher and educator in the arts and herbal education. I put together a list of some simple things to consider if you are homeschooling or teaching in general. 10 simple things to consider if you want to teach your own children, other other children in a formal or informal setting. 1. Teach something ( a subject) you know really well. It’s almost like sharing if you teach something that comes naturally or like second nature.
2. Have a plan, and a back up plan. Whatever you plan to teach for the day, always bring something extra in case you run out of material, or you need just have circumstances that cause you to change directions. I would say the most common occurrence I have had is children who work fast, and need something to do, while other children are still working. So have a back up plan. 3. That being said- do not try to cram too much information into a short period of time. I go for quality rather than quantity. Try to teach a concept really well, versus trying to teach many concepts quickly. 4. Ask questions. When I teach, I usually say a few things, then ask questions, and then continue teaching. Children kind of space out when you just talk and talk and talk. I think adults do as well, for that matter. If you stop, pause and ask questions, you engage your audience in what they are learning. You also find out if they are understanding what you are saying. 5. Always always have the children (even older children) write their names on papers immediately. 6. Try to get to know a little bit about what children like. For example if they like Pokemon, figure out a little. You win kids over by being able to talk their language. 7. Keep the peace. If you have a child who is causing some disturbance. Just go over and talk to them quietly. “Hey what’s going on today?” Sometimes they may tell you something, like they need to go to the bathroom, or they may be upset over something. Maybe offer them a short rest. Sometimes this is all you need to do to get them back on track. 8. Children like music and songs. If you have some little fun songs or learning tricks to remember information, children love to repeat with song. 9. Encourage. Some kids need more encouragement than others. “Good Job- and say their names.” I am poor at remembering names. I have kids make name tags in the beginning of a class, that helps me. They love to hear their name. 10. Rotate around the room. This works especially if you have a larger group. But even with a small group, try to get to each student. Make your presence known to all. Level: Elementary, Middle, & Possibly High School Age Written by: Jenel Schaffer A lesson plan that shows students how to make a Sandpaper print in either Abstract or Realistic design. Time: 1 Class Period, 1.5-2.0 hours long Concept: 2D Print with Sandpaper Art Elements: Color, Shape, Line & Texture After completing this project the student will be acquainted with the following:
Mixed media, Shape, Mosaic, Complementary Colors, Pointillism Motivators/Visuals:
Materials:
Lesson:
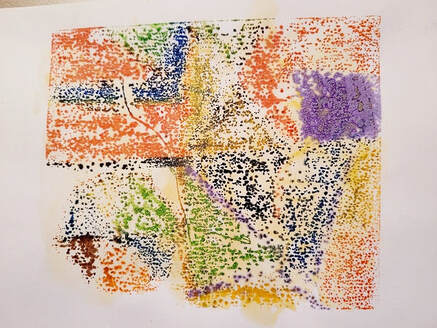 Print made on paper from sandpaper. Abstract original design. Elementary age.  Abstract print made on paper with sandpaper print. Elementary age.
9/27/2020
How to Make an Herbal Dream Pillow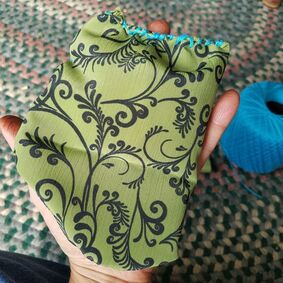 This "how to" is not a spiritual exercise, but I guess it could be if you should choose to see it that way. I won't be getting into the science of aromatherapy. This is just an exercise for fun, and relaxation, and to enjoy the fragrance of plants and herbs. I also wanted to do this exercise, because I wanted to teach my boys how to sew, and I thought it would make a great sewing project. What you need to do this: 1. HERBS- I used Lavender, Rose petals, Chamomile, Mugwort, Lobelia, Hops, Spearmint, Peppermint and Boneset. To be honest, I kind of wanted to use up some herbs I had had a little while. All herbs listed here, except for the Boneset and Lobelia sitting for a few months. Although herbs can last years if store properly, I do not like to have my herbs sit and sit. The Lobelia and Boneset were wildcrafted at a creek bed, and I had dried quite a bit, so I decided to add a little to the mixture. The Hops was in powder form, because that is what I had, but I would really recommend HOPS flowers. I did not use a specific recipe, but for the purpose of this post, I will give you one so you know what to do! When I give parts, I will give part the value of 1 ounce. Ingredients: 2 parts Rose petals 2 parts Lavender petals 1 part Chamomile flowers 1 part Mugwort 1 part Spearmint 1 part Peppermint 1/2 part Hops flowers, or clusters 1/4 part Lobelia (optional) 1/4 part Boneset (optional) ** You can add any other herbs you want to this mixture. The more fragrant flowers you add, the more fragrant your dream pillow. 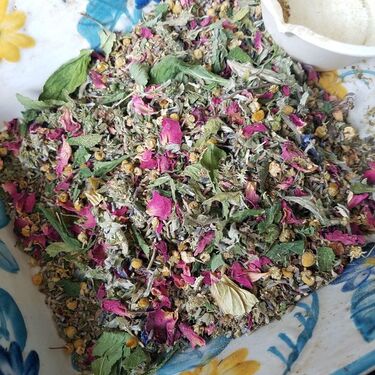 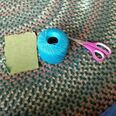 BI always mix my herbs in ceramic, or pottery dishes. You can use wood, glass, or other natural material. I believe that all life forms, and plant do have life- emit an energy force. I like to use natural materials, because they have more life energy, than say- plastic. You will also need fabric. I suggest choosing fabric that is not too thin, or too thick (like flannel). You want it to breath, so you can smell the herbs. Choose something soft and appealing. I chose to use bigger needles and crochet yarn, which is about the thickness of embroidery floss. I wanted my kids to sew with bigger needles and thread, because it is easier to learn to sew with bigger tools. I found that this worked out really well. I cut the squares to sizes 4 x 5 inches (approximately). You can choose any size you want! Usually they are smaller, but it really depends on the size you want to make. I told my kids to fold their cut fabric, hamburger style and with the pattern facing inward. We sewed three sides, and then flipped the fabric, inside out which really made it the correct way, and then stuffed the fabric with our herbs. We premeasured all the herb mixture to determine how much we wanted to use for each pillow. We wound up with 7 cups, and made 7 pillows. To be honest, I would have liked to use more herb in my pillow for the size 4 x 5". I think 1 1/2 cups would have been better. The last simple step, is just to sew up the final side. Yeah! Then put it on your pillow or in your pillow case, or even beside your bed. The fragrance is a welcome delight when you arrive to bed, and wake in the morning. Below is the video I made on this DIY project. If you make your own, please come back and comment. Have a blessed day!
11/8/2018
Why I homeschool:I never expected to have children. In fact at one point, I definitely said I was not going to have any children. Now I have 5 wonderful blessings. They are all so wonderful. I could not imagine my life without them, and I can not believe how much I have changed because of them. Homeschooling was never on my radar. That was my husband's idea. I resisted it mentally for a number of years, because it was not my idea. You know how we need to feel like we thought of something to want to do it. Last year, my 3 older children went to school for the year. The year was amazing, as far as school goes. I was happy with everything, but, I missed something, we missed something. They missed what I feel like children need most. They missed the extra hugs, and kisses. They missed quiet talks with me. They missed the slower pace. They missed the one on one attention that they receive at home. They missed the camaraderie of brothers (4 boys), and the connection with their sister. They missed the time to daydream and think of the future, and who they want to become. They missed the sunshine, and fall leaves, and reading books outside. I know they missed all these things, because I missed them too. I grew up away from home. I had two loving parents who did what everyone else did. Put kids in school, sports and a slew of activities. I wanted nothing more to be home with my family, and spend time making art, and going outside. I lost myself, before I ever found myself, because that is what happens to a child when they are with groups and peer pressure constantly. They learn how to fit into a group, but they do not learn who they are. I want my children to know who they are, and be connected to where they come from. To me, that is the greatest gift that I can give them- the gift of themselves. |
AuthorJenel Schaffer Videos on YouTube Archives
April 2021
CategoriesAll Art & Healing Books Dried Herbs Fresh Herbs Gluten Free Herbal Beauty Herb Consultations Homeschool Positive Mind Recipes Root Herbs Self Care Spirit Tea Watercolor |
 RSS Feed

|

Best place for bulk herbs and spices□
|

My Young Living Website
 Jake Ducey 10K in 10 Weeks Jake Ducey 10K in 10 Weeks
Copyright Jenel Schaffer, Sheep Hill Herbs LLC, 2020-2023 🌲🌳 |
Rosemary Gladstar's "The Science and Art of Herbalism Course"
Sheep Hill Herbs LLC
347 Godfrey Street Rehrersburg, PA 19550 |

My Etsy: Sheep Hill Herbs
|